Wednesday 29 December 2010

Santa was late.

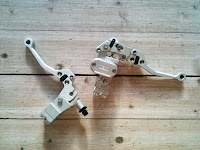
But then again, what's a day or two when you get something like this! I mentioned earlier that I tried a Keihin FCR flat slide carb on my bike during the summer and I just could not believe what a difference it made compared to my old Del' Orto. It was as if the old jerky and vibey Husky big bore lump had suddenly been transformed into a modern, smooth and really powerful weapon. It also made the bike a doddle to start – hot or cold. I've been on the lookout for a 41 mm FCR ever since, but come across a lot of dodgy ebay-sellers that refused to send images or otherwise behaved strangely.

Then I found this Dutch website: http://www.frankmxparts.com/ and got in contact with the very friendly and helpful owner Frank. Not only did he find the carb I needed, he also got it jetted to my specs, changed the wire operated (from the handlebars) hot start mechanism to a simpler and nicer button on the carb and changed all the transparent tubing for black ones. The cost of all this, including shipping: €360. Considering that the carb I got is almost new (and really looks as good as new too) and that the throttle and cables were included, well, I think that is awesome value.

If you want to transform your thumper, buy an FCR. And do buy it from Frank.

Sunday 28 November 2010

Got it!

Now I know what I want to build next. A Porsche 909 Bergspyder. The pic is from Porsches' own museum and doesn't it look great? It was built in 1968 "specifically for competing in hill climbing competitions" and it weighed an incredible 385 kg! That's a 100 kg less than the weight of a modern Formula 1 (sans driver and fuel)! The 909 encompasses everything I like; light weight, no nonsense styling and of course: black rims. Now I just need to work out how it would look as a motorcycle. And what engine it should have. Back to the drawing board!

Friday 19 November 2010

Help please.

Can anyone tell me where the wheels on this KTM comes from? They're obviously 19-inchers (which we like), but I can't place them. Any help appreciated.

Friday 5 November 2010

Quo vado?*

Now that the Husky tracker is finished [I've unofficially christened it the "Sidetracker" since it proved such a distraction from my other obligations like work and my other projects], I find myself in the most enviable position there is: with a blank slate in front of me. This means I can go in any direction I want, and I find that feeling quite exhilarating.

I have a mental short list of bike projects I want to try and one of them is building a really nice café racer. A month or so ago I found a Buell engine on the web that was for sale at reasonable money and I did what I usually do in these circumstances: I fired up Photoshop and tried a couple of ideas. Now, there is nothing at all wrong with a CB750 special or a nice Bonneville, and in fact I may come back to those bikes later on, but I felt I needed a bigger challenge. The Husqvarna tracker was challenging since most street trackers are either Harley/Buell, Triumph or Rotax engined. There isn't very many Husky street trackers around. With that in mind I sketched a new frame and borrowed bits and pieces from other bikes to see how it could look. You find the sketches above [with and without bullet type fairing].

The scale and measurements aren't a hundred percent correct, but I still think it could have turned out pretty nice. But... the Buell engine turned out to be less good than advertised and I lost interest in the project. Now I'm thinking of doing 4 cylinder tracker along the lines of the R1 street tracker that Gregg's Customs made last year. Mine would be less "blingy" and perhaps use a smaller engine (like from an R6). What do you think?

*First person version of "Quo vadis" - meaning "where are you going".

Thursday 30 September 2010

One liquid cooled framer - done!

Without further ado, here it is...

(low res pics taken with my compact. Proper studio shots to be taken later).


Monday 27 September 2010

Victory!

I'm very happy to report that I'm now the proud owner of a fully legit, road legal, street tracker. My framer passed the final inpection about an hour ago. Now I'm going to mount the proper tires and the ISR brake stuff and take some pictures for you of the finished article. Then it's time for a professional photo shoot (if everything goes according to plan you might see the bike in one of our favorite mags in the not too distant future).

BTW: It wasn't the carb that was acting up, it was a faulty ground wire.

Friday 24 September 2010

Buggeration!

Believe it or not, but I missed my M.O.T-appointment this morning since the bike absolutely refused to start. This is the first time ever that I've failed to get it running. I kicked the damn thing for 40 minutes and got it running for one (1) second only for it to die again. I've now bought a new plug and have another carb lined up if it turns out it's the carb that's acting up. I've managed to get a new M.O.T-appointment already on Monday morning. Fingers crossed.

I'm now on the look out for a flat slide 39 or 41 mm carb. My friend changed his Dell'Orto for a Keihin flat slide and it runs like a dream now and start first kick every time. So if you've got a spare one, drop me a line.

Wednesday 22 September 2010

Damn it! (part 2)

Well, look what I got in the mail today... Yes, I went for the radial one. And yes, it is a little bit on the large side. But as "Road Warriors" pointed out: the rest of the running gear is really modern, so I decided continue my theme of juxtapositioning old school elements like the tank and seat with bang up to date engine and brake components. I think it's this mix of 1975 and 2010 that makes my bike stand out somewhat among other trackers.

I won't mount them until this weekend after the final MOT on friday. Will post some pictures of the finished bike then, including some other minor touches I've been busy with. Then it's on to the next one. I'm working on a Photoshop composite of a café racer at the moment. I hope you'll like it!


Tuesday 7 September 2010

Damn it!

I promised myself that I would keep my old Brembo brake pump and clutch lever, but I just can't resist ISR's stuff. It's just so... bl**dy gorgeous in a Mies van der Rohe "I didn't intend for this Skyscraper to look this good, I just paid a lot of attention to the proportions" kind of way.

So... I called Acke Rising (owner of ISR) to hear what I should buy. He suggested the old style brake pump (he knows I'm building a tracker), but I had my heart set on a radial one. What do you think: radial or old school?

Saturday 28 August 2010

Free distort.

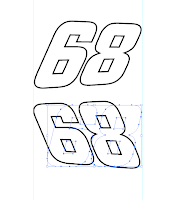
I like italic racing numbers on bikes. They look like they are forced into leaning backwards as the bike accelerates. At least if you view the bike from the left side. The problem is that if you put italic numbers on the right side of the bike – then they lean the wrong way! Not nice. Thankfully there is a workaround. You will need Adobe Illustrator (or another vector graphics application) and a little patience. But it will be worth it.

Step 1 is choosing a font that you like. I very much like a font called "City" that was designed in the 1930s for the Berthold type foundry in Berlin. So I chose that.

Step 2 is firing up Adobe Illustrator. Make a new document and write your desired numbers two times. “Create outlines” of the numbers (It's under "Type" in the top menu). This will turn your numbers into easily manipulated vector objects.

Step 3: select the effect called “Free distort” (Effects/Distort & transform/Free distort). You can now distort the numbers into pretty much any shape you like. In order for mine to fit in with the lines of my tail piece I made my numbers a little bit lower towards the end of the bike, which will emphasize the "leaning" effect. I added a black outline to my numbers for that "Nascar" look.

Step 4 is saving your document as an Illustrator eps-document and then emailing it to your local digital printer who will print them on vinyl and cut them out for you. There really isn't more to it!

Friday 27 August 2010

polymimetic alloy.

No, the part in the picture is not manufactured by Skynet in some sort of potential alternate future. It's actually made in good old Sweden by a firm called ISR.

As I'm waiting for the beuraucratic paper mill to return my paperwork, I've been busy making some decals and surfing the web for a replacement for the crude looking Tochico brake caliper I've been using so far. And beeing Swedish, there just is no way around the fact that ISR makes som pretty impressive and affordable stuff. At least if you compare to other calipers of the same quality
(I won't post the price here since I suspect my wife checks this blog now and then, but it was about a third of the cost of a comparable Brembo caliper.). ISR makes six piston calipers as well, but I went with four pistons since I think it looks better. And besides: who has ever seen a race bike with six piston brakes?

It needs new spacers, but the very friendly proprietor of ISR, Acke Rising, has promised to turn some for me. I'll post a pic of it mounted when the spacers arrive. Now I just have to resist the temptation to buy new master cylinders from ISR as well...

Sunday 15 August 2010

Thrilla in Svedala.

Put on the kettle and get comfortable, cause this post is going to be long. In my last post I wrote that I had booked an appointment to get the final SFRO-approval for my frame. What I hadn't expected was that this final inspection would turn into such a palaver.

But before we proceed I thought I’d just take a minute to explain the process of getting what is to all intents and purposes a scratch built framer through the Swedish M.O.T/approval procedure. The Swedish government has outsourced the responsibility for inspecting “amateur built” bikes and cars to an organisation called SFRO. SFRO consists of a small number of Swedish car and bike enthusiasts who, by being fiercely thorough make sure that no dangerous or badly built contraptions reach the streets. And by making sure of that, they protect the hobby from bureaucrats who would like nothing better than to put a stop to our beloved hobby. I just wanted to make that clear from the outset to make sure you don’t get the impression that I in any way have a beef with SFRO. You can see where this is leading now can’t you…?

In order to get a bike like mine approved you first have to get your frame/bike SFRO-inspected in an unpainted state. At this point the welds must be left untouched (i.e. not ground or sanded). This to show that the craftsmanship is up to scratch and that the overall geometry of the frame is sound. I passed that one with flying colours. Next step is to paint and assemble the bike and have the bike noise tested. And as you know, I somehow managed to pass that one too. The third step is where the SFRO inspector actually rides your bike and makes sure that it handles and that the brakes work and so on. If it does, you can then book an appointment to have the bike M.O.T’d and get your official papers and your registration plate.

So, with that in mind, let’s rewind the tape a month or so. I loaded my bike on my rental trailer and drove the 75 clicks to Svedala where I was meeting up with the SFRO guy. I unloaded and the guy complemented my on the looks of the bike, the components and the overall craftsmanship. After taking some measurements he mounted a G-meter on the tank and drove off. He came back after 15 minutes or so and I got compliments on the brake performance. Not surprisingly really since the brakes are a bit oversized, to put it mildly. He then checked the paperwork once more and was just about to put his stamp of approval on the bike when he decided to have one last look on the receipt I got from the place where we bought the frame tubes…

As I may have mentioned, SFRO doesn’t like Cro-Mo tubing, so we decided to opt for regular steel tubes to make sure the bike passed with as little fuss as possible (the bike is so light anyway that it makes little difference on the street). Now, SFRO publishes a book every other year where all construction rules, permitted measurement etc are listed together with a list of all the different kinds of tubing that SFRO prefers. What we didn’t know at the time when we ordered the tubes, was that SFRO, in their latest book (that we didn’t have), had inserted a paragraph where it stated that cold drawn steel tubes should be avoided due to possible problems with brittleness resulting from bending the tubes.

The SFRO-guy looked up from his papers and said in a sombre voice “we have a problem”. He explained the issue and my heart sank. Suddenly my frame was unusable anywhere outside of a racetrack. I loaded the bike up again and thoughts of torching the bike and trailer and leaving it by the roadside to burn went through my head. My wife told me later that I looked completely gutted when I walked through the door.

After a few days of almost clinical depression I got a text from the SFRO-guy where he stated that there was one possibility we could try: a Brinell-test to see if the tubes we had used perhaps would fall within the permitted tolerances after all. He would start looking for the test equipment that was supposed to be somewhere in Sweden. The weeks came and passed. And with them the best part of the Swedish summer. Until finally this week when I got the call: “Can you come to Svedala on Saturday? We have a bit of a SFRO-conference and I have been able to locate the Brinell-test equipment”.

I felt a bit like I was presenting my bike to the Spanish Inquisition as I rolled my framer into the large garage where the SFRO-guys were having their meeting. I was told to leave and come back in two hours. I drove to a press centre and picked up the new PB while I waited for the minutes to tick down.

I hour, 59 minutes and 50 seconds later I pulled into the court yard and was met by “my” SFRO-guy who, not unlike the emperor in “Gladiator” slowly raised his hand in front of him, stuck his thumb out and gave me a slow-motion thumbs up… It passed.

In the image above, you can see where they scratched off the paint in order to test the steel. I guess I will have to repaint the frame, but I’d much rather do that than start all over from scratch!

I know I've said this before: but this time it really is close to finished...

Thursday 8 July 2010

The sound of silence.

If you've ever heard a big bore Husky at full chat you know it's loud. Proper loud. Little children screaming, car alarms going off at 50 yards - loud. Then imagine that you have an 84-decibel limit to adhere to. That's exactly what I was up against today when I did the mandatory noise test for my street tracker.
I always thought that passing the noise test would be the hardest part of the whole M.O.T-process and I knew from the start that there was no way in h**l that I could get my bike under 84 dB at full throttle – not unless the test was done in deep space. So first on my list was finding a way of making it impossible to give the bike the full beans. After some head scratching I found a nice little hole on the underside of the plastic carburettor lid. I put a 50 mm long screw in there, which made it impossible to lift the throttle more than about 40 % of the way. That went some way towards getting the noise down. Next up was filling the SuperTrapp silencer with sound deadening fibre glass "wool" and taking out 11 of the 12 discs at the end of the silencer.

At this point I was kind of happy with the results but the induction sound from the carb was still too loud to my ears (I was guessing at this point since I didn't have a dB-meter). So yesterday night I started panicking a bit and began botching together a sort of external air box over the exposed KN filter. And when I say botch, I really mean botch. Or how does cutting out plastic pieces from IKEA boxes, filling it with cell foam and gaffer taping it all up sound? Botch Engineering Ltd.

After a few hours sleep I brought the bike up from the garage to do a test start before I was to load it and go to Malmö (some 65 clicks away). It absolutely refused to start! No matter how many times I kicked the thing – nothing. Obviously it didn't get enough air and I had to modify my "air box" one more time, with one hour to go to the test. I finally got it started and it sure was quiet:-) I also ran like Chitti Chitti Bang Bang with a bad cold. Ah, to hell with it I thought and loaded up.

After waiting in line for an hour or so, watching all sorts of machinery go through the sound trap, I handed my bike over to the guy who was going to do the test ride past a dB-meter and watched him "speed off" with the engine coughing and farting on "full gas" (40% throttle). On his return pass I could see the frown on his face and he gave me the bike back stating that it "just wasn't working". I felt the panic rise since I knew that there wasn't going to be a new test for some weeks. I told him I was going to do some mods and could he please give it one more go? At this point the other bikes and cars had passed their tests and it had started raining. So I started tearing frantically at my "air box" to try to give the bike some more air. Guess what? The bike refused to start. I kicked and kicked. I checked the plug, the fuel and everything else I could come up with. Nothing. After some 15 minutes of this I was drenched in sweat. Seconds from giving up, the last remaining biker told me to throw away that stupid air box since "I was screwed anyway". I did and the bike fired up and I handed it over to the tester, expecting disaster.

But do you know what? IT PASSED! I was actually one dB under the limit even without the stupid airbox. I haven't felt so relieved in years. On Monday I'm going back to get the final clearance on the frame and then the final M.O.T will be a mere formality. Wish me luck!

Sunday 13 June 2010

It's a wrap. Or is it?

I spent a few good hours yesterday wrapping my exhaust. A pretty fiddly job, even with the coolers off. The headers turn and twist and the clearance is marginal at best. Now, I know that exhaust wrap isn't strictly in keeping with the flat tracker-style, but the Husky exhaust isn't the prettiest in the world and I like the way a wrapped exhaust looks. So sue me.

It looks like a piece of cake, but it is actually pretty difficult to get the wrap to fit perfectly. After having finished with the light coloured wrap (picture #1) I took a step back to admire my handiwork. And quickly realised that it looked too retro. And that the light wrap clashed with the colour theme of the rest of the bike. Damn!

30 minutes later I had purchased a new wrap (another 50 Euros) and started over again. This time, with the darker wrap (picture #2), I think I got the look I was after.

A word to the wise: use a long sleeved sweater and maybe even latex gloves when you wrap your own exhaust. Those little fibre glass strands itch like a son of a *****. I washed my arms three times and still couldn't stop the itching. In the end I had to resort to using my wife's body lotion. Yuk.

BTW: the new Öhlins spring is now in place (after having been powder coated black). It's 60 Nm instead of the 110 Nm standard spring. Hopefully this will smoothen out the super stiff ride.

Tuesday 8 June 2010

Under cover.

The traditional flat track frame (and trust me: I've studied quite a few) uses a turned up metal loop as a connection point for the rear bodywork. Or in the case of a Woods frame, the rear frame loops around the bodywork. The loop makes the rear frame stiff and light.

I knew however that I needed an easy way to fix the rear light, reg plate and indicators on my street tracker, so I opted for a slightly different rear frame with a small "shelf" at the back. Not quite as light but it makes for a convenient place to put some of the electric gubbins that are not needed on a race tracker. None of these components are visible once the rear bodywork is fixed in place and the "shelf" protects them from rear wheel spray. As you can see from the image, the horn was relocated backwards as well.

Wednesday 2 June 2010

Vive la resistance!

First of all: I'm no electrician. Despite having read many books on the subject, I still can't differentiate between my watts and my amperes. So when I couldn't get my indicators to work properly I had to consult a friend (thanks Erik).

The problem was that when I had replaced my standard indicators, which used a 23 W light bulb, with my new mini indicators, which contain LEDs instead of bulbs, the current would "creep" (lay mans term) around the system and make all four indicators light up at once. A bit confusing for the people behind my bike. I had changed the indicator relay for one suited for LED indicators, so the blink frequency was correct, but the "Christmas tree" effect persisted.

It turns out that LED indicators use as little as 1 W and thus the current would go through them almost without noticing the LEDs (again: lay mans terms). So to make it work we had to install a couple of resistors to "fool" the system that the 23 w bulbs where still there. Two resistors from "Biltema" did the trick once they were installed together with the rear indicators. Just remember to install them "in parallel" with the indicators. Now everything works and its time to shrink hose the whole loom to make it reasonably waterproof. Not that I'm ever going to ride in rain, but still.

Saturday 29 May 2010

Blinker, part 2.

And this is what it looks like in place. Once painted black, I hope it will look even less conspicuous. But that will have to wait until after the MOT (the triple trees will get anodized as well).

Took it for a longer spin today, and managed to summon up the courage to let go of the bars at speed. It tracked straight and true. Phew.

Wednesday 26 May 2010

Blinker.

Is "blinker" American English BTW? Anyway: I've been unable to find a solution for where I should place the front indicators on my bike. At one point I thought about integrating them into the top triple tree, but changed my mind at the last moment. I've also looked into the idea of having them on the ends of the handlebars, but since the flat track bars are quite wide, I dismissed that idea as well. In the end it became apparent that I needed some sort of custom made bracket to put them on the forks. The Swedish rules state that the indicator lenses need to be at least 240 mm apart and cannot sit together with the headlight.

Anyhow, I made a drawing, brought one of my mini indicators with me and payed a visit to "Kent" the aluminium wizard who lives about 20 klicks from me. Three days later I picked up the bracket in the picture. It looks huge, but it is only as wide as the forks and it will sit – turned upside down – underneath the lower triple tree and only about 25% of it will be visible. The bracket will be painted black in order not to stand out against the black fork tubes and only the curved parts at the ends will protude out and to the sides when the bike is watched from the front (and, no there isn't room to mount the indicators behind the fork tubes - the radiators are in the way.). Now I just need to get the airfilter and the rear light (it refuses to work as advertised) sorted. Then I can book an appointment with the M.O.T inspector.

Thursday 20 May 2010

It's aaaalive!

Believe it or not, but after having gone through the usual start procedure (choke out, five kicks with the decompression handle held in, choke in) the trusty big bore Husky engine fired up as if it was just yesterday, never mind two years since it last barked into life!

To say I was elated is an understatement. I didn't quite trust my ability to get the new wiring loom right and I guess I've had some subconscious doubt that it would actually work. I've had the flu pretty bad for two days but that was soon forgotten as I very gingerly let the clutch out and did a few really slow laps up and down the street applauded by my oldest son (he's eight and thinks I'm Pierre Terblance and John Britten rolled into one).

First findings? Well the rear spring is way too stiff. No surprise there and I'll just order a new one. It also felt stupidly light! I don't know if that is to do with the fact that the bike is lower now than it was in super moto guise, but it feels as if I could pick it up like a bicycle. I'll weigh it later, but I'm guessing around 130 kg. More soon!

Wednesday 19 May 2010

Neato.

I have a lot of respect for the way that ISR does things. And not only 'cause they're Swedish. I love the no-nonsense, form-follows-function look of their stuff. And the fact that they are pretty affordable considering the quality.

I discovered a cool feature today when I bled the rear brake caliper. In lieu of the standard type bleed nipple, where you push the clear bleed hose onto the same nipple that you then turn to let the air out, ISR have a nice little system where the bleed nipple and the bleed screw are separated. The brass bleed nipple in the picture is only used when bleeding and thanks to an o-ring, can be threaded in using only finger force (there's one on the back side of the caliper for the other piston as well). The hose stays put since you don't turn the nipple and the blue screw is easily accessible using a 11 mm ring spanner for botch free operation. Perhaps not the biggest innovation ever, but still a nice little feature that I imagine would make a professional spanner man happy.

I'm going to get one of these for the front brake as well...

Friday 14 May 2010

Aaaaaalmost there.

As you can see from the image, I am now very close to finishing my build. I have a little bit of the new wiring loom still to do (the old one was so bad I just couldn't look at it), some brakes to mount and bleed, exhaust wrap to, er, wrap and a few other minor tweaks before I can hoof the kick starter and – hopefully – revive the engine that has been dormant for almost two years now. Oh yeah, I will mount an air filter from K&N too.

If you're wondering if I've lost the plot totally and mounted tires from some 80's two stroke learner bike, then let me explain. You see, the very thorough man from S.F.R.O will not give me the final approval of the bike if I use tires that aren't marked "for road use". Hence the old and tired tires that I got from a wonderful man in Stockholm who runs a shop called "Wheeler Dealer" (if you've met him you know what I'm talking about). Approximately 30 seconds after I get the final M.O.T the bike will be wearing the proper Maxxis tires again. The ugly yellow spring on the Ohlins damper will be painted black by then too.

I can now hear the missus dressing up the kids downstairs for a dinner at some of our friends, which "I just don't have the time for, since I have a s**t load of work to do". Time to make a double espresso and head down to my garage...

Wednesday 14 April 2010

Plumbing, done.

Liquid-cooled engines have their pros and cons. They can generally handle higher power outputs (since they are better at shedding heat) – which is always a good thing. The flip side of the coin is that there is no getting away from those bulky coolers and all that piping. And sometimes it can all look a bit like snakes on a plane. Tear the plastic off from a water-cooled Ducati and you'll see what I mean. My Husky engine is no different.

Thankfully, a few of the ugliest parts will be obscured somewhat by the tank. And my radiator-shrouds will hide the backs of the coolers, which are both vulnerable and unsightly. In the picture you can also find the ignition coil and the voltage regulator which have found new homes under the top tube and will be hidden from view by the tank. The streaky rubber thingy wrapped around the top tube is actually a vibration damper for washing machines which I found at "Claes Olsson". It fits perfectly in the "tunnel" under the tank and will make sure that the alu tank doesn't crack from the vibrations. There is a similar one furter back on the top tube as well (not in picture).

So far everything has gone together pretty easy. Hopefully this will continue. Next up: the wiring.

Tuesday 30 March 2010

Black is the new black.

I finally got my finger out and did the finishing touches on my radiator "shrouds" and the brake hanger. After a LOT of rubbing with a Scotch Brite cloth – all in the same direction mind you – I had my wife drop them off at the anodizers a couple of days ago. I got them back today and the results are excellent. The shrouds really look factory made, rather than botched together by a copywriter with very limited metal working skills.

Since I didn’t polish the details to a shine, but rather “scarred” the surface very, very finely with the Scotch Brite, the anodized finished turned out a deep satin black that almost absorbs light – like a Skunk Works drone.

Anodizing is now officially my favourite way of finishing alu parts. As soon as we finish the triple trees, they will go in the anodizing bath too. To create some contrast I’ll go for a traditional polished finish and perhaps a gun metal colour to offset the black fork legs.

Thursday 18 March 2010

Shaving my legs.

I think radially mounted brakes look much tidier than conventional ones. There is however one big drawback when using forks with mounting points for radial brake calipers: they are an integral part of the fork bottoms and can't be unbolted. And since my forks came off of a Gixxer 750, both legs had the mounting points (I will only be using one calliper). And it looked crap with that empty "horn" sticking out into thin air on the right side of the bike...

Now, if I was a much more accomplished mechanic, maybe I could have disassembled the forks and put the fork bottoms in a lathe, but to tell you the truth, I couldn't work out how to loosen the damn things. I guess they are pressed into place? Or maybe there is a bolt holding them on inside the fork sliders?

The only way forward I could think of was to put the right fork leg in the mill and machine off most of the mounting points structure (see picture 1). This step could have been accomplished with a hacksaw as well, but if you have a CNC mill at your disposal… The result can be seen in picture 2. Better, but not good. Next step was to somehow round off the part where the mounting points used to be and make it look as if it was never there. This took me a few hours, using a combo of pneumatic angle grinder/sander, and a flat steel file. Take it real easy here so you don’t remove too much material!

The final step was to restore the matt painted finish (picture 4). I went for a special brake calliper paint that is supposed to withstand brake fluid, which can wreak havoc on standard paint. It came in a spray can, and despite the salesman’s repeated guarantee to the contrary, turned out as glossy as a grand piano. I let the paint harden and then took the shine off with a scotch brite cloth. Result.

Monday 15 March 2010

Candygram for Mongo!

Look what the friendly UPS-man brought me today! Yes, it's the long awaited tank and seat unit. And I'm quite pleased.

If I may say so myself, it really hits the mark I was aiming for: a sort of homage to the old school Husky ruby red bikes, mixed with the traditional flat tracker aesthetics that got me hooked on the whole flat/street tracker thing in the first place. And trust me, the picture does not do it justice. The two-tone red scheme doesn't really show up and the flake looks much better IRL. I'll bend the arm of one of my photographer friends and make him take some proper shots of the bike when it's finished (before I flip it...).

The paint was laid down by Death Spray Custom in London. But if you don't like the scheme, the fault is all mine. He (Death Spray) wanted to do an altogether more creative paint scheme, but since the rest of the bike is all about modern/high tech components, I wanted to keep the paint traditional. Was it the right decision?

Tuesday 2 March 2010

Ooops.

My invoice from Pro-Bolt... Not cheap for a handful of bolts. But as we say in Sweden: "det kostar att ligga på topp":-)


Monday 1 March 2010

First layer down.

Just got this image from David of Death Spray Custom in London who is doing the paint job. Looks promising!

Saturday 27 February 2010

That's more like it!

I got the frame back from the powdercoaters yesterday, and I'm happy to report that this time around it looks great. The satin black finish gives it a lovely "factory" look that I really like. And in retrospect, the matt finish that I went for at first, maybe wasn't the best idea, since it might have proven too difficult to keep clean.

I got a few other bits and bobs painted as well. More on that later. Next up: compiling a list of all the bolts I need and ordering those from tastynuts.com. With the frame and the rest of the components looking as good as they do, I can't very well bolt it together with anything other than top of the line fasteners, now can I?

Monday 15 February 2010

It all adds up...

Almost two months ago I ordered 12 countersunk, stainless bolts from a company called McMaster-Carr in the states. I needed them to fasten my sprocket and rear brake disc to my PM rear wheel, which uses a really archaic bolt pattern and 7/16'' bolts. A month passed without any bolts arriving. Then a further two weeks. A call was placed and met with the suprising answer: "We cancelled your order due to export restrictions". "-Come again? Export restrictions? I wasn't aware that old imperial bolts were covered by some sort of non-proliferation treaty", I replied. "And why haven't you informed me of the cancellation?" Since the customer relations person at the other end couldn't give me a satisfactory answer, I hung up. Annoyed, to say the least.

Since McMaster-Carr were the ONLY source I could find for the bolts I needed (stainless 7/16'' contersunk must be the rarest bolts in the world), I had to resort to having them custom made. A company called Acme Stainless in the UK made the ones in the picture and had them sent to me within a week. The cost? £65 including postage. Aouch!

Wednesday 10 February 2010

Halfway there.

In this day and age of iPhones, nano-tubes and what not, it's easy to overlook some of last century's high tech, like the CNC-mill. In essence 1970's technology (invented in the 50's), it still makes my mind boggle at the sheer precision of the thing. I understand the basic principles of it all, but the way it moves in 1/1000 mm increments back and forth, and even more amzingly, mills perfect circles in solid blocks of metal is just astounding to me.

As you can see, the upper triple tree is almost there (lower part of picture), while the lower tree is still a big, but not heavy, piece of billet.
The difference in weight between these and my steel prototypes is amazing. Next up: machining the "slots" and the threads for the bolts that will tighten the clamps around the fork legs.

Tuesday 9 February 2010

Dangerous times.

At the moment I'm waiting for my frame to come back from the powder coaters and my tank and seat unit to come back from the guy in London who's doing the flake job. Until I get the frame back, there is not much I can do on the bike (apart from finishing the triple trees which is pencilled in for for Monday) and my brain has started whispering: "–screw this project, let's move on to the next one... It will be much more fun than this... Haven't you've always said you were going to do a cafe racer... I bet there is a nice paralell twin engine somewhere on eBay..."

Must. Not. Start. New. Project.
Must. Finish. This. One. First.

Thursday 21 January 2010

What's wrong with this picture?

I'll give you a hint: there is something missing.

I've had a bad really bad day today;
suppliers screwing up, customers complaining, horrible [even by airline standards] food on the plane from Stockholm etc. So when I got a call from the powder coaters that the pieces I gave them a week ago were ready for pick-up, I envisioned a weekend locked in my basement, finally assembling my tracker. Suddenly my other worries melted away. But, alas, it was not to be. And it's probably my own fault. You see, I wanted my frame, swingarm and a couple of other brackets and stuff painted with a kind of powder that leaves a rough, semi matt, almost crackelated finish. The guy had limited experience with the stuff, but told me he would give it a try.

To say that it looked shite is like saying emo-rock sucks. Rather than the slightly bumpy, semi matt apperance I was looking for, it looked as if the frame had been left out in the rain for ten years and then coated with a thin, shiny black film, exposing the rusty, pitted material underneath. I was gutted. The shiny pieces (see image) where fine, but the rest has to be redone. To his credit, the painter didn't argue, and promised to media blast the pieces again and redo them. Plain old satin black this time. Oh well, what's another two weeks?

Thursday 7 January 2010

Flake.

I got a paint sample in the mail today from the guy who is going to paint the tank and seat unit. It turns out that flake paint is not like ordinary paint in the sense that you can mix in some other colour in order to change the shade – like add a bit of white to turn a blue colour into light blue. Instead, it's the small flakes themselves that are coloured. So in order to change the hue of the finished paint, you have to use different background colours "behind" the flakes. The left part of the paint sample was painted red before the flakes were applied, and the right part was painted black. As a result the right part of the sample looks darker from some angles, but not all (you cant really see the black base paint). From straight on it's hard to tell the difference, but from a more oblique angle the difference is clear. I really like the "red flake on black background"-colour. It looks a bit like the old Husqvarna "Ruby red" paint (image here). I think I'm going for that as the base colour.

Monday 4 January 2010

Yokes 2.0

After getting some excellent feedback from #15 (among others), I've decided to change the design of my yokes. The "integrated indicators"-design that I had in mind is now out. I got a little bit carried away with that and maybe it was a little bit to elaborate for a street tracker? I now have a different idea for how I'm going to mount the front indicators, involving a bent aluminium tube that will sit under the yoke (more on that later). And yes: I need indicators for my bike to pass the final M.O.T. After that they can, err, fall off. I guess...

While I'm at it, I'll add 10 more mm of grountrail by shortening the offset to 30 mm, giving me a total of 100-105 mm ground trail.